2026 Concrete Prices in Edmonton (Per Sq Ft)
Planning a new driveway in the Haysboro neighbourhood or a foundation for an addition in Silver Springs? Understanding the real cost of concrete in 2026 is your first step to a solid budget. Prices have shifted with inflation and supply, but knowing the local price per square foot keeps your project on track. This guide breaks down exactly what Edmonton homeowners and contractors can expect to pay, from a basic slab to complex finishes. We’ll provide realistic 2026 price ranges and explain what drives them, so you can plan with confidence. For a project-specific quote from a local authority you can trust, reach out to EdmontonConcrete. Average Concrete Costs in Edmonton Before diving into specifics, it helps to have a ballpark figure. The average cost for a standard concrete pour in Edmonton ranges from $10 to $25 per square foot. That’s a wide range because so many factors are at play—from the type of finish to the condition of your site in neighbourhoods like Glenora or Capilano. This section will give you the foundational numbers to start your planning. Cost Per Square Foot for Concrete Slabs The most common way to price concrete work is by the square foot. For a basic, 4-inch thick slab with a simple broom finish, you’re typically looking at $10 to $15 per square foot. This price usually includes site preparation, forming, the pour, and the finishing work. It’s the benchmark for projects like shed bases, simple patios, or garage floors in newer communities like Windermere. Cost Per Cubic Yard or Meter Contractors and suppliers also quote by volume, especially for larger projects. In Edmonton, you can expect to pay between $180 and $250 per cubic yard for the ready-mix concrete itself, delivered. Remember, this is just for the material. Labour, forming, reinforcement, and finishing are all separate costs that get added on top, which is why the per-square-foot quote is often more useful for total budgeting. Price Ranges by Project Size Larger projects often benefit from a lower price per unit due to economies of scale. A 500 sq ft driveway might come in at the higher end of the $12-$18 per sq ft range, while a 2,000 sq ft commercial pad might be quoted closer to $9-$14 per sq ft. Smaller projects under 100 square feet often see a premium, as they require the same mobilization and setup for a contractor but with less material. Getting multiple quotes is key to finding fair pricing for your specific scope. Bottom line: Always get quotes based on your complete project scope, not just material volume. Factors Affecting Concrete Prices Why does one quote differ so much from another? The final price isn’t just about the grey stuff. Several key elements combine to determine your final cost, and understanding them puts you in the driver’s seat. A project on a tricky, sloped lot near the North Saskatchewan River valley will involve different costs than a simple, flat backyard in Mill Woods. Material and Concrete Strength Variations Not all concrete is created equal. The mix design—specifically the compressive strength measured in MPa (Megapascals)—directly impacts price. A standard 25 MPa mix for a driveway is common, but a 32 MPa mix for a heavy-duty shop floor costs more. Additives also play a role. Air-entraining agents for freeze-thaw resistance (crucial for Edmonton winters) or accelerators for faster winter curing will add to your material bill. Specifying the right mix for the job is a balance of performance and cost. Labor and Contractor Costs Skilled labour is one of the largest components of your quote. Experienced concrete finishers command wages that reflect their expertise in handling Edmonton’s tight pour schedules and achieving a smooth, durable finish. A crew’s reputation, insurance, and warranty offerings are built into their rate. Choosing the cheapest labour often leads to costly corrections down the road, like spalling on a Whyte Avenue sidewalk after one winter. Site Preparation and Accessibility This is the wild card. Is the site clear, level, and easy for a concrete truck to access? If the answer is no, prices rise. Excavation, tree root removal, bringing in granular fill, and building a stable sub-base all add significant cost. Tight access in mature neighbourhoods like Highlands, where trucks can’t easily maneuver, may require pump trucks or additional manual labour, adding hundreds or even thousands to the project total. Project Size and Complexity A simple rectangular slab is the most cost-effective. The moment you add curves, multiple levels, intricate forming, or integration with existing structures, complexity—and cost—increases. Stamped patterns, exposed aggregate finishes, or coloured concrete require more time, specialized tools, and skilled artisans. That stunning patio in Laurier Heights comes with a price tag that reflects the artistry involved. What separates a great pour from a failed one? Often, it’s the investment in proper site prep and skilled labour. Concrete Pricing by Project Type The best way to gauge your potential cost is to look at typical price ranges for common projects. The following table provides 2026 estimates for Edmonton, but remember these are starting points. Your specific location, site conditions, and design choices will move you within or even beyond these ranges. Project Type Price Range (CAD) Notes Basic broom-finish driveway $10–$15 / sq ft Standard 4-inch slab, includes base prep Stamped concrete patio $18–$28 / sq ft Complexity of pattern affects price Exposed aggregate walkway $16–$24 / sq ft Includes washing and sealing Foundation (per linear foot) $200–$350 / ln ft Highly dependent on depth and engineering Garage floor (standard finish) $8–$12 / sq ft 5–6 inch slab, often requires thicker base Standard Concrete Slabs As the workhorse of concrete projects, standard slabs for garages, sheds, or basements range from $8 to $14 per square foot. The thickness is a major driver; moving from a 4-inch to a 6-inch slab increases material costs by about 50%. Reinforcement like wire mesh or rebar is often recommended, especially in areas with unstable soil, adding $1 to $3 per square foot to the total.
Best Retaining Wall Materials for Edmonton’s Soil
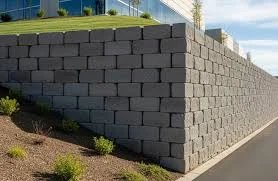
Noticed your yard in Terwillegar Towne starting to slump or planning a new build in the Highlands? Choosing the wrong retaining wall material for Edmonton’s unique clay soil is a costly mistake we see too often. This guide cuts through the noise to show you the best options, ranked for our local climate. Let’s find the right material to secure your property for decades, just like we do at EdmontonConcrete. Why Retaining Walls Are Essential for Edmonton’s Sloped Yards and Clay Soil Edmonton’s terrain isn’t flat, especially in river valley communities like Cloverdale or older areas with natural grade changes. Those beautiful, sloped lots come with a challenge: soil movement. A well-built retaining wall does more than just hold back dirt—it creates usable space, prevents erosion, and protects your foundation. Think of it as an investment in your property’s structure and aesthetics. Without one, you’re fighting a losing battle against gravity and our harsh weather cycles. Challenges of Edmonton’s Soil and Frost Heaving Our region is famous for its expansive clay soil, which acts like a sponge. It absorbs water in the spring and fall, then expands and contracts violently during our deep freeze-thaw cycles. This phenomenon, called frost heaving, can exert immense pressure—enough to crack weak foundations and shove poorly built walls out of alignment. It’s not just about holding soil; it’s about engineering a structure that can withstand these hydraulic forces. A wall that works in Vancouver’s mild, sandy soil will likely fail here within a few seasons. That’s why drainage is just as critical as the wall material itself. Benefits of Retaining Walls for Property Value and Usable Space The immediate benefit is turning a precarious, unusable slope into a flat patio, garden bed, or safe play area. This functionally adds square footage to your outdoor living space. From a value perspective, a professionally installed, durable retaining wall is a recognized hardscape improvement. It shows prospective buyers that the property is stable and well-maintained. More importantly, it prevents the slow, costly damage that soil slippage can cause to fences, sheds, and even your home’s foundation over time. Bottom line: a proper retaining wall solves a structural problem while boosting your home’s functionality and curb appeal. Top Retaining Wall Materials: Types, Pros, Cons, and Costs With so many products at the big-box stores, how do you choose? We’ve ranked the top materials based on their performance against Edmonton’s specific challenges: frost, clay, and heavy loads. The ranking considers durability, installation complexity, and long-term value. 1. Concrete Blocks and Segmental Blocks This is our top recommendation for most Edmonton homeowners, and for good reason. Segmental retaining wall (SRW) blocks are engineered concrete units with a lip or pin system that locks them together. They’re designed specifically to handle lateral earth pressure and are inherently flexible, allowing for slight movement without cracking. The key benefit is their balance of strength, aesthetic variety, and relatively straightforward installation for pros. You can find them in a range of colours and textures, from classic stone-look to modern smooth finishes. One caveat is that their success is 100% dependent on a perfectly prepared, compacted base; a sloppy base will lead to tilting and failure. 2. Poured Concrete For the ultimate in strength and a seamless, modern look, poured concrete is the heavyweight champion. We use reinforced concrete with rebar for walls that need to hold back significant loads, like those for a raised driveway or a multi-tiered landscape in a new Windermere development. The key benefit is monolithic strength and design flexibility for curves or unique shapes. The major caveat is cost and complexity—it requires forming, reinforcing, and professional pouring, making it a poor candidate for DIY. It’s also less forgiving of settlement than segmented systems. 3. Natural Stone Nothing beats the timeless, high-end beauty of natural stone like limestone or fieldstone. It’s incredibly durable and blends perfectly with natural landscapes, especially near the North Saskatchewan River Valley. When built correctly with a solid concrete footing and proper drainage, a stone wall can last a century. The key benefit is unparalleled aesthetics and longevity. The caveat is the sky-high cost, both for materials and the highly skilled labour required for dry-stack or mortared construction. It’s also very heavy, complicating delivery and installation. 4. Timber and Wood Pressure-treated timber (like 6x6s) offers a rustic, cost-effective look that was once very common. It’s relatively easy to work with for a DIYer tackling a small garden wall under 4 feet. The key benefit is lower upfront material cost and a warm, natural appearance. The critical caveat is its limited lifespan in our wet climate. Even treated wood will eventually rot, especially at ground contact points. It’s generally not recommended for structural, load-bearing applications or walls over 3 feet high in Edmonton. 5. Other Options like Allan Blocks Allan Block is a leading brand of segmental blocks, often mentioned by name. They represent the high end of the SRW category, with engineered designs for very tall walls and commercial applications. Other systems like Keystone or Versa-Lok operate on similar principles. The key benefit is their proven, tested engineering for severe conditions. The caveat is that they are typically a contractor-supplied product and can be pricier than generic store-brand blocks. They are an excellent choice when you need certified performance data for a critical project. Option Best For Price Range (CAD) Verdict Concrete Segmental Blocks Most residential projects, DIY-friendly lower walls, curved designs $20 – $40 / sq ft installed Best Value Poured Concrete High-load applications, modern aesthetic, tall commercial walls $35 – $60 / sq ft installed Premium Natural Stone High-end landscaping, heritage properties, unmatched natural beauty $50 – $100+ / sq ft installed Premium Timber Temporary or low, non-structural garden walls, strict budget projects $15 – $25 / sq ft installed Budget As you can see, segmental concrete blocks offer the best blend of durability, cost, and suitability for our climate. Poured concrete is the go-to for maximum strength, while timber is a budget option with
How Thick Should Concrete Foundations Be in Edmonton?
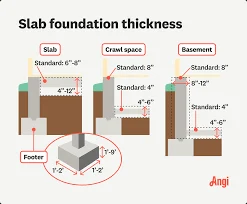
Planning an addition on your home in Riverbend or a new commercial build in the Warehouse District? Understanding how thick your concrete foundations need to be is the first step toward a project that lasts. It’s not just about pouring a slab; Edmonton’s unique soil conditions and climate demand a careful approach. Here’s what you actually need to know to ensure your investment stands solid for decades. The team at EdmontonConcrete has seen too many failures from cutting corners on foundation thickness. Getting this right protects your home from cracking, shifting, and costly repairs down the line. Recommended Thickness for Concrete Slabs and Foundations While there are minimum code requirements, recommended thickness is what truly protects your project from Edmonton’s realities. These guidelines go beyond the bare minimum to account for real-world use and long-term durability. Think of them as the smart, experienced standard. Minimum Thickness for Foot Traffic, Patios, and Sidewalks (100 mm or 4 inches) For surfaces that only need to handle people walking, a 4-inch (100 mm) slab is the standard baseline. This applies to garden paths, simple backyard patios, and most public sidewalks. The load is relatively light and evenly distributed. Even at this thickness, the subgrade must be properly compacted. A patio in Old Strathcona built on soft, uncompacted fill will crack even with a 4-inch slab. Bottom line: for foot traffic alone, 100 mm is your starting point, but never skip the prep work. Thickness for Residential Driveways and Light Vehicles (100-125 mm or 4-5 inches) Your driveway bears a heavier burden. A typical sedan weighs between 1.5 and 2 tons, concentrated on four small tire contact patches. For a standard two-car driveway in a neighbourhood like Glenora, a 4-inch slab is the absolute minimum, but 5 inches (125 mm) is the smart choice. The extra inch provides a significant margin of safety against the freeze-thaw cycle and the occasional heavier delivery truck. Many reputable contractors, including EdmontonConcrete, default to 5 inches for residential driveways to ensure longevity. Thickness for Trucks, RVs, and Heavy Loads (150 mm or 6 inches+) Planning to park a work truck, RV, or boat? You’re now in the realm of heavy point loads. These vehicles can easily weigh 3 tons or more, putting immense stress on a thinner slab. For these applications, a minimum of 6 inches (150 mm) is non-negotiable. In some cases, especially for commercial loading bays or areas with constant heavy traffic, engineering may call for 8 inches or more. This is a common consideration for properties along the industrial corridors near the Yellowhead Trail. Footing Thickness Requirements (100 mm or Greater than Projection) Footings are different from slabs. They are the wide, buried base that spreads the building’s load over the soil. The rule of thumb for footing thickness is that it must be at least as thick as the wall it supports projects outward from its center. For a standard 8-inch thick foundation wall, the footing must be at least 8 inches thick. More importantly, the Canadian Building Code specifies that the footing thickness must not be less than 100 mm. In practice, residential footings in Edmonton are typically 8 to 12 inches thick to handle our soil conditions. Alberta Building Code and Local Regulations in Edmonton Following the Alberta Building Code (ABC) isn’t just good practice—it’s the law. The code provides the minimum legal standards for safety and durability. Edmonton-specific bylaws and the realities of our climate often push practical requirements beyond these minimums. Minimum Footing Thickness per Clause 9.15.3.8.(1) The ABC is very specific. Clause 9.15.3.8.(1) states that the thickness of a concrete footing must not be less than the greater of 100 mm or the projection of the footing on either side of the supported wall, column, or pier. This is the technical basis for the “thickness equals projection” rule. This clause exists to prevent the footing from shearing or bending under load. It’s a critical calculation that forms the basis of all engineered foundation designs for homes and buildings across Alberta. Structural Analysis and Engineering Requirements For most standard single-family homes, builders use prescriptive code guidelines. However, when you have unusual soil, a steep slope, or a uniquely heavy structure, a structural analysis is required. A professional engineer will calculate the exact loads and specify footing dimensions and reinforcement. This is common for custom homes in ravine areas like Terwillegar Towne or for any commercial project. The engineer’s stamp on the drawings is your assurance that the foundation is designed for the specific conditions of your site. Site Preparation and Subgrade No matter how thick you pour your concrete, it will fail if the ground beneath it is unstable. Proper site preparation is arguably more important than the pour itself. This is where many DIY projects in Edmonton go wrong. Removing Vegetation, Dirt, and Soft Spots All organic material like grass, roots, and topsoil must be excavated down to stable, undisturbed mineral soil. Organic matter decomposes over time, leaving voids that cause settlement and cracking. Any soft, wet, or spongy areas must also be dug out and replaced with compactable material. Think of it as setting a table. You wouldn’t place a fine china plate on a wobbly, lumpy tablecloth. The same principle applies to your $15,000 concrete slab. Granular Base and Compaction (20-25 mm Material) Once you reach stable ground, you add a layer of granular base material. In Edmonton, this is typically 3/4-inch down to 1-inch (20-25 mm) crushed gravel or road crush. This layer provides a stable, draining platform. The key word is compaction. Each 4-6 inch layer of gravel must be mechanically compacted with a plate compactor or a jumping jack tamper. Properly compacted base won’t show footprints when you walk on it. Skipping this step is an invitation for the slab to sink and crack. Reinforcement and Concrete Mix Specifications Reinforcement is what turns brittle concrete into a strong, ductile structural element. It holds the concrete together as it shrinks and resists tensile forces
Concrete vs Interlock: Complete Comparison
Choosing between a poured concrete driveway or an interlocking paver patio in Calgary isn’t just about looks or price. It’s a long-term decision that affects how your property handles our notorious Chinook cycles and harsh winters. From the icy sidewalks of Inglewood to new builds in Springbank, homeowners and developers face this same dilemma every season. So how do you cut through the noise and pick the right surface for your home, business, or development? Let’s dive into a complete, Calgary-focused comparison of concrete vs interlock, with clear pros, cons, and local considerations. What Are Interlocking Pavers? Interlocking pavers are individual, pre-cast concrete blocks manufactured to fit together tightly without mortar. They rely on precise shapes and a mechanically locked edge profile to create a unified surface over a prepared sand and gravel base. This system creates a flexible, grid-like mat that can handle ground movement. They come in a vast array of colours, textures, and shapes—from classic rectangles to intricate fan patterns. For a project like a pathway along the Bow River pathways or a commercial entrance in the Beltline, this design flexibility is a major draw. The key is that each paver is a discrete unit, which fundamentally changes how the installation behaves over time. What Is Concrete? Concrete is a monolithic, poured-in-place surface. It’s a mixture of cement, aggregate (like gravel or crushed stone), sand, and water that’s poured into forms on-site and hardens into a single, continuous slab. Whether it’s a simple broom-finish driveway in McKenzie Towne or a stamped patio mimicking stone, it’s all one solid piece. This continuity gives concrete its strength and seamless look, but it also means the entire slab reacts as one unit to stress. The quality of the pour, the mix design, and the finishing techniques—factors EdmontonConcrete services specializes in—directly determine its lifelong performance against Calgary’s freeze-thaw challenges. Durability and Longevity Both materials are durable, but they fail in different ways. In Calgary, durability isn’t just about strength; it’s about resilience to thermal expansion, ground heave, and de-icing salts. Interlocking Pavers Durability Interlock’s greatest strength is its fault tolerance. Because each paver moves independently, ground settlement or freeze-thaw heave rarely causes catastrophic failure. A sunken area in your Killarney driveway might cause a slight dip, but you can simply lift and re-level the affected pavers with fresh bedding sand. The pavers themselves are incredibly dense and strong, often with a compressive strength exceeding that of poured concrete. However, the system’s weakness lies in its edges and joints. Without proper restraint, pavers can spread laterally over time, and joint sand can wash out, requiring periodic top-up. The key takeaway: Interlock handles ground movement gracefully, but requires ongoing joint maintenance. Concrete Cracking and Freeze-Thaw Resistance Concrete’s monolithic nature is a double-edged sword. A properly engineered and poured slab is immensely strong and load-bearing, ideal for heavy traffic or commercial loading zones. However, any weakness—like improper curing, a poor base, or inadequate reinforcement—affects the entire slab. In Calgary, the biggest threat is uncontrolled cracking from thermal stress. When water penetrates cracks and freezes, it expands, causing spalling (surface flaking) and widening the fault. High-quality concrete from a local expert like Edmonton Concrete, with proper air entrainment and reinforcement, is designed to minimise this, but cracking is always a risk. Bottom line: Superior concrete can last decades, but its failure is often total and repair is invasive. If you’re focused specifically on outdoor living spaces, explore our Concrete vs Pavers: Best Choice for Patios? to compare design, durability, and maintenance. Cost Comparison Cost is often the deciding factor, but it’s crucial to look beyond the initial invoice. A true comparison includes installation, long-term value, and the cost of ownership over 10-15 years in our climate. Initial Installation Costs Generally, interlocking pavers have a higher upfront cost per square foot. The precision manufacturing of the units, the more labour-intensive installation process involving precise cutting and placement, and the higher-quality granular base required all contribute to this. For a standard residential driveway, interlock can be 20-40% more expensive initially than poured concrete. Concrete’s initial cost is lower because the material is less expensive and the installation process, while skilled, is faster for large, unbroken areas. However, costs rise quickly with decorative finishes like stamping, exposed aggregate, or colouring, which can bring it closer to paver pricing. Long-Term Costs and Value This is where the comparison shifts. Interlock’s maintenance is predictable and relatively low-cost: topping up joint sand and occasional releveling. Major repairs are piecemeal and cheap. Concrete maintenance is less frequent but far more expensive when needed. Sealing is required every few years, and crack repair or full section replacement is costly and disruptive. Resale value can also differ. In many Calgary neighbourhoods like Aspen Woods, the high-end aesthetic and perceived durability of quality interlock can positively impact property value. Concrete’s value is more consistent but less likely to be a standout feature. Budget Examples Let’s put numbers to it. For a 500 sq ft driveway in Calgary: The smart approach is to budget for the *total* cost over 15 years, not just the day-one price. Which offers better long-term value? It depends entirely on how you weigh upfront investment against future repair bills. Installation Process and Timeline How these surfaces get installed affects your project schedule, disruption, and the final outcome’s quality. Interlocking Pavers Installation Methods A proper interlock installation is a multi-layer, engineered system. It starts with excavation and a compacted subgrade, followed by a gravel base layer, a bedding sand layer, the pavers themselves, and finally joint sand and edge restraint. Mechanical Interlock This refers to the physical shape of the paver edges (like knobs and grooves) that lock together horizontally, preventing individual units from shifting. It’s a feature of the paver design itself and is critical for maintaining surface integrity without mortar. Structural Interlock This is the system-wide stability achieved by combining mechanical interlock with proper edge restraint (like concrete curbs or spike-down plastic borders) and a well-compacted base. Structural interlock
Concrete vs Pavers: Best Choice for Patios?
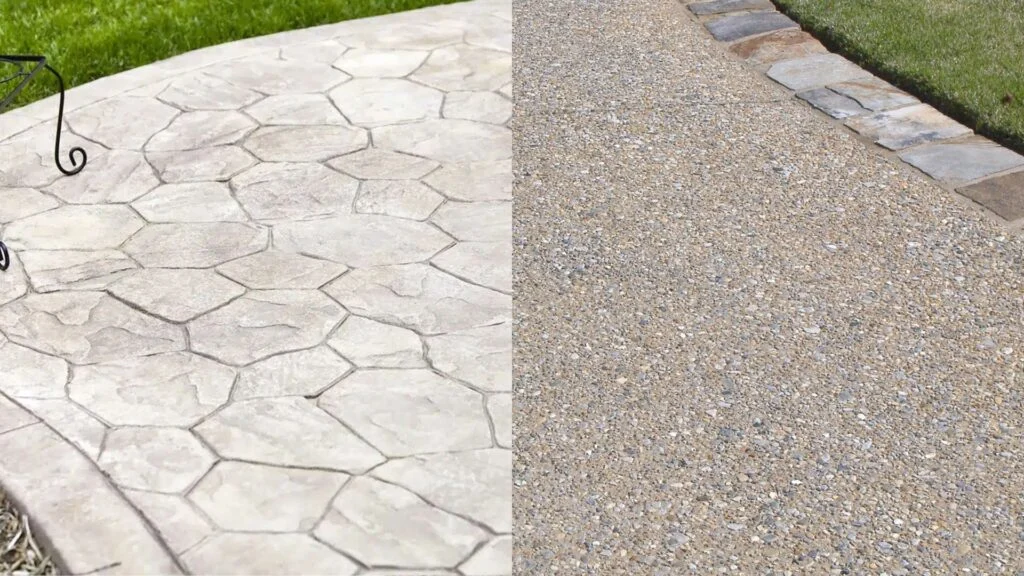
Planning a patio upgrade in Mount Royal or a new build in McKenzie Towne and stuck between concrete and pavers? This is one of Calgary’s most common landscaping dilemmas. The right choice affects your budget, weekend maintenance, and how well your patio handles our famous chinooks and deep freezes. Let’s cut through the confusion and compare these two heavyweights side-by-side. Your decision impacts everything from upfront cost in Calgary to long-term curb appeal. As your local concrete authority, EdmontonConcrete helps homeowners and builders across Alberta make informed choices. We’ll break down the pros, cons, and local realities of each option so you can invest with confidence. What Are Concrete Patios? A concrete patio is created by pouring a wet mixture of cement, aggregates, and water into forms on a prepared site. Once cured, it becomes a solid, monolithic slab. Modern techniques, like stamping and coloring, allow it to mimic more expensive materials while retaining its inherent strength. It’s a popular, versatile foundation for outdoor living spaces throughout communities like Brentwood and beyond. The installation is a continuous process, resulting in a seamless surface. This uniformity is a key characteristic, offering a sleek, modern look that many Calgary homeowners appreciate for its simplicity. The final product’s performance hinges heavily on the quality of the initial mix design and the skill of the installation crew. Pros of Concrete Patios Concrete’s primary advantage is its lower initial cost per square foot compared to most paver systems. It provides a incredibly durable and strong surface that, when installed correctly, can last for decades. The smooth, seamless finish is also easier to keep clean from spills and general backyard debris. With advanced finishing techniques, concrete offers surprising design flexibility. You can have it stamped to look like stone, stained in a range of earthy tones, or given a brushed finish for added texture. This makes it a cost-effective way to achieve a high-end aesthetic without the premium price tag of natural stone pavers. Cons of Concrete Patios The most significant downside is its susceptibility to cracking. Calgary’s aggressive freeze-thaw cycles and expansive clay soils can cause stress fractures over time, even with control joints. These cracks can be tripping hazards and are difficult to repair invisibly. The large, impermeable surface can also contribute to water runoff issues during our heavy spring rains. Repairs are rarely seamless. Fixing a cracked section often involves cutting out the damaged area and pouring new concrete, which will almost always show as a patch. Furthermore, if you ever decide to change the design or color, your options are limited to overlays or a complete tear-out and replacement. What Are Paver Patios? Paver patios are constructed from individual, interlocking units made of concrete, brick, or natural stone. These units are laid over a compacted gravel and sand base, creating a flexible, permeable surface. The key distinction is that they are not a single slab but a system of many pieces working together. This modular approach is a major benefit. Pavers are manufactured to precise tolerances, allowing for intricate patterns like herringbone or basket weave. They are the go-to choice for projects in areas with challenging drainage or soil movement, such as properties on the slopes near Nose Hill Park. Pros of Paver Patios Pavers excel in repair and flexibility. If a section heaves or becomes stained, you can simply lift out the affected units and replace them without leaving a visible patch. Their permeable design allows water to drain between the joints, reducing surface runoff and complying with modern landscaping best practices. The aesthetic appeal is immediate and vast. With countless colors, shapes, sizes, and textures available, you can create a truly custom look. This design versatility often translates to a higher perceived value and can boost your home’s resale appeal more noticeably than standard concrete. Cons of Paver Patios The most notable drawback is the higher initial material and installation cost. The process is more labor-intensive, requiring precise grading and cutting of individual pieces. Over time, the joints between pavers can settle unevenly or become invaded by weeds and ants, requiring ongoing maintenance. While individual pavers are strong, the surface can feel less solid underfoot than a concrete slab, especially if the base preparation wasn’t perfect. Snow removal can also be trickier, as sharp shovel edges or metal plows can catch on the joints and potentially dislodge pieces. If you’re still weighing your options, explore our Select Concrete vs Interlock: Complete Comparison to understand long-term performance differences. Cost Comparison Budget is often the deciding factor. It’s crucial to look beyond just the sticker price and consider the total cost of ownership over 10-15 years, including installation, maintenance, and potential repairs. Calgary’s competitive contracting market means prices can vary, but general ranges hold true. Bottom line: concrete wins on upfront cost, but pavers can offer better long-term value if repairs are needed. Concrete Patio Costs In Calgary, a basic broom-finished concrete patio typically ranges from $15 to $25 per square foot, installed. This includes site preparation, forming, pouring, and finishing. If you opt for decorative upgrades like stamping, coloring, or exposed aggregate, the price can climb to $20-$35+ per square foot. The price reflects the material efficiency and faster installation process. You’re paying for the material and the skilled labor of the finishers who have a narrow window to get the texture and finish perfect before the concrete sets. Paver Patio Costs Paver patios start at a higher price point, generally between $25 and $40+ per square foot for a quality installation with a concrete base. The cost is driven by the price of the individual pavers themselves and the significantly higher labor required for pattern layout, cutting, and precise placement. Natural stone pavers like flagstone or limestone will push the price to the higher end of that spectrum or beyond. The complexity of your design, including curves and patterns, will also add to the final invoice from your Calgary landscaper. Long-Term Value This is where the comparison gets interesting.
Concrete vs. Asphalt Driveways: Pros, Cons & Cost
Staring at the cracked, weathered surface of your old drive in Sunnyside or planning a new development in Quarry Park? Choosing between concrete and asphalt is one of the biggest decisions you’ll make for your Calgary property. It’s more than just picking a grey colour—it’s a long-term investment in curb appeal, maintenance schedules, and value. This detailed comparison from the local team at EdmontonConcrete cuts through the confusion, laying out the real-world pros, cons, and costs you need to know. Key Differences Between Concrete and Asphalt At first glance, a finished driveway in Bowness or McKenzie Lake might look similar, whether it’s concrete or asphalt. The core differences, however, lie beneath the surface and dictate everything from cost to longevity. Understanding these fundamentals helps you make a choice that stands up to Deerfoot Trail traffic and Chinook-driven thaw cycles alike. Material Composition Concrete is a rigid pavement made from a mixture of cement, water, sand, and aggregate like gravel or crushed stone. It cures into a hard, solid slab that supports weight through its own structural strength. Asphalt, or asphalt concrete, is a flexible pavement consisting of about 95% stone and sand bound together by a viscous bitumen (asphalt cement) binder. That binder is what gives asphalt its signature black colour and flexibility. This fundamental difference in composition directly influences how each material behaves under Calgary’s temperature swings and heavy loads. Climate Suitability Both materials are used worldwide, but their performance varies dramatically with climate. Asphalt’s flexibility makes it better at handling ground movement and slight heaving from frost, common in areas with expansive clay soil like many Calgary communities. Concrete’s rigidity makes it exceptionally durable but more prone to cracking if the base isn’t perfectly prepared for our freeze-thaw cycles. Hot summers are another key factor. Asphalt softens slightly in high heat, which is why you might see temporary tire marks on a hot day in the Beltline. Concrete, however, reflects more heat and remains dimensionally stable, making it a consistent performer through our summer heatwaves. Lifespan and Durability When properly installed and maintained, concrete significantly outlasts asphalt. A high-quality concrete driveway can last 30 to 40 years or more. A well-built asphalt driveway typically lasts 15 to 20 years before requiring a full replacement. Durability also refers to resistance to wear. Concrete is highly resistant to oil spills, UV degradation, and de-icing chemicals. Asphalt is more susceptible to damage from oil and gas drips, which can break down the binder, and requires protection from UV rays to prevent it from becoming brittle and grey. Asphalt Driveways Known for its smooth, dark finish and lower initial price tag, asphalt is a popular choice for many Calgary driveways and commercial lots. Let’s break down what choosing asphalt really means for your home in Tuscany or your commercial property near the airport. Pros of Asphalt The most immediate advantage of asphalt is its lower upfront cost compared to concrete, which we’ll detail in the cost section. It’s also faster to install; a crew can often complete and compact an asphalt driveway in a single day, and it’s ready for light use within 24-48 hours after cooling. Its flexibility is a major asset in our climate. Asphalt can bend slightly with ground movement, reducing the likelihood of major cracks from frost heave. Repairs are also generally simpler and less expensive, involving patching or overlaying rather than full slab replacement. Cons of Asphalt The trade-off for a lower initial cost is a higher maintenance commitment. Asphalt requires sealing every 2-3 years to protect its surface from water, oil, and UV rays. Without regular sealing, it oxidizes, turns grey, and becomes brittle, leading to cracks and raveling (loss of aggregate). It has a shorter overall lifespan and is more vulnerable to damage from automotive fluids. Its dark colour also absorbs heat, contributing to minor softening in peak summer temperatures and potentially leading to a hotter microclimate around your home. Cost of Asphalt Driveways For a standard residential driveway in Calgary, asphalt installation costs typically range from $8 to $12 per square foot. This price includes site preparation, a compacted gravel base, and the asphalt layering and compaction. For a typical 600 sq ft double driveway, you’re looking at an initial investment of $4,800 to $7,200. These costs can fluctuate based on accessibility, the complexity of the site grading, and the current price of oil, which affects the cost of bitumen. Always ensure your quote includes a detailed breakdown of the base preparation, as a poor base is the leading cause of premature asphalt failure. Installation Time Speed is a key selling point for asphalt. The installation process is relatively quick. After the sub-base is graded and compacted, hot-mix asphalt is delivered, spread with a paver, and rolled with a heavy compactor. The driveway needs to cool and harden, but it can usually handle vehicle traffic within a day or two. This quick turnaround minimizes disruption, a crucial factor for businesses or homeowners who need reliable access. Bottom line: if you need a new driveway fast, asphalt delivers a usable surface in minimal time. Maintenance Requirements Asphalt maintenance is non-negotiable. A proper maintenance regimen starts with a protective sealcoat applied 6-12 months after installation and then reapplied every 2-3 years. This sealant fills small surface voids, restores the rich black colour, and blocks water and oil penetration. You should also perform visual inspections each spring after the thaw. Look for new small cracks, which should be cleaned and filled with a rubberized crack filler to prevent water from seeping in and undermining the base. Ignoring these small steps leads to potholes and expensive repairs. Repair and Resurfacing Common asphalt repairs include filling cracks, patching potholes, and applying a new wear layer or “overlay.” Crack filling is a routine DIY or professional task. Pothole repair involves cutting out the damaged area, replacing the base material, and compacting new hot-mix asphalt into the hole. When the surface shows widespread cracking, raveling, or oxidation, a 1.5 to
Retaining Wall Shotcrete Services Calgary
If you’re planning a custom pool in Aspen Woods or tackling a major retaining wall project in Tuscany, you’ve likely heard two terms thrown around: shotcrete and gunite. Knowing the difference is more than just industry jargon—it’s about ensuring your project is built to last through Calgary’s tough freeze-thaw cycles. Here’s what Calgary homeowners and contractors actually need to know to make the right call for their specific job. What is Shotcrete? Shotcrete is a method of placing concrete where a pre-mixed, wet concrete mixture is pneumatically projected at high velocity onto a surface. Think of it like a high-powered hose spraying a ready-to-go concrete mix. This technique is prized for its efficiency and ability to create uniform, dense layers. The key is that all the ingredients—cement, aggregates, and water—are combined before they hit the nozzle. For complex shapes or vertical applications, like the curved walls of a luxury home feature in Mount Royal, shotcrete provides exceptional control. It bonds incredibly well to existing surfaces and can be applied in thinner layers than traditional poured concrete. That makes it a go-to for structural repairs and intricate architectural work across Alberta. Wet Shotcrete Process The process begins with a fully hydrated concrete mix being loaded into a shotcrete rig’s hopper. This mix is then pumped through a delivery hose to a nozzle, where compressed air propels it onto the target surface. The operator at the nozzle has direct control over the placement and pattern. Because the mix is wet, it arrives at the surface with a consistent slump and workability. This allows for a smoother finish right out of the gun, which can be further troweled if needed. It’s a method favoured for its speed on large commercial projects, like the foundational work seen along the Bow River pathway developments. For projects demanding a fast, consistent application with minimal rebound waste, wet-mix shotcrete is often the superior choice. What is Gunite? Gunite, often used interchangeably with “dry-mix shotcrete,” is a process where dry cement and aggregate are propelled through a hose, with water added exclusively at the nozzle just before ejection. This method offers the operator significant on-the-fly control over the mix’s water content. It’s the classic technique behind many of Calgary’s iconic backyard swimming pools and free-form rock landscapes. The dry materials are mixed in a chamber and blown through the hose using compressed air. At the nozzle, a skilled nozzleman injects a precise stream of water, hydrating the mix instantly as it’s sprayed. This allows for immediate adjustments based on the substrate’s absorption and the desired consistency. Dry Gunite Process The gunite process relies heavily on the skill of the nozzle operator. They control the water injection valve, directly influencing the mix’s workability and final strength. Too little water and the material won’t adhere properly; too much and it can sag or run. This hands-on control makes gunite exceptionally versatile for sculptural work. It’s the reason you see those perfectly smooth, radiused pool coves in communities like Lake Bonavista. The operator can build up layers gradually, creating strong, monolithic structures without the need for extensive formwork. Gunite’s strength lies in its adaptability, making it ideal for custom, artistic, or complex vertical applications where standard forms won’t work. According to industry standards from the American Concrete Institute (ACI), proper shotcrete application significantly improves structural durability Key Differences Between Shotcrete and Gunite While both methods involve spraying concrete, the core differences lie in *when* the water is added and *how* the material behaves during application. These distinctions directly impact your project’s cost, timeline, and final quality. Mixing and Water Addition This is the most fundamental difference. Shotcrete uses a pre-mixed, wet concrete, similar to what you’d see in a standard Omega ReadyMix truck. Gunite, conversely, combines dry cement and aggregate, with water added at the very last second at the nozzle. The wet-mix process offers more consistent hydration, while the dry-mix allows for immediate adjustment. Application Method Shotcrete is typically pumped through the hose and then accelerated by compressed air at the nozzle. Gunite uses compressed air to blow the dry mix through the hose, injecting water at the tip. This leads to different equipment setups and requires different operator skillsets. A gunite nozzleman needs extensive experience to judge the water ratio correctly in real-time. Slump and Consistency Shotcrete arrives with a predetermined, consistent slump because it’s mixed at the plant. Gunite’s consistency is variable and controlled on-site. This means shotcrete is less prone to sag on vertical surfaces, while gunite can be made stiffer or wetter to suit immediate conditions, like a porous existing wall in an older Bridgeland renovation. Strength and Quality Control Both methods can achieve high strengths, but control points differ. Shotcrete quality is largely determined at the batching plant, offering predictable results. Gunite quality is heavily dependent on the nozzle operator’s expertise. A top-tier operator can produce incredibly strong, dense material, but the risk of inconsistency is higher with less experienced crews. Your choice often comes down to prioritizing consistent plant-controlled quality (shotcrete) versus versatile, operator-dependent adaptability (gunite). To better understand performance differences, explore our guide on differences between Shotcrete vs Gunite before choosing a method. Pros and Cons of Shotcrete Understanding the trade-offs of each method is key to a successful project. Shotcrete brings modern efficiency but isn’t perfect for every scenario. Advantages of Shotcrete Shotcrete excels in speed and volume. The pre-mixed material allows for a much faster rate of placement, which can significantly shorten project timelines. It also produces less rebound (wasted material that bounces off the surface), making it cleaner and more cost-effective on large, straightforward pours. The consistency of the wet mix leads to more uniform density and strength throughout the applied layer. This is a major advantage for critical structural elements, like foundation walls or seismic retrofits, where predictable performance is non-negotiable. Disadvantages of Shotcrete The primary drawback is its lack of on-site adjustability. Once the mix leaves the plant, its water content is fixed. This can be problematic
Shotcrete vs Gunite: Differences and Applications
You’re standing in your backyard in Altadore, coffee in hand, visualizing a new swimming pool or a modern retaining wall for your Riverbend property. Your contractor mentions “shotcrete” and “gunite,” and you nod along, but a question lingers: what’s the real difference? Knowing which one is right for your Calgary project isn’t just technical jargon—it’s the foundation of its success. Here’s what you actually need to know to make an informed decision. OmegaReadyMix, with its years of Calgary-specific experience, knows that from the clay-heavy soils of the deep southeast to the windswept lots in Skyview Ranch, the right material choice is everything. What is Shotcrete? Think of shotcrete as ready-to-use concrete, fired out of a hose at high velocity. The concrete arrives on-site in a truck already fully mixed with water, just like the concrete you’d see for a driveway pour along Macleod Trail. This pre-mixed slurry is then pneumatically propelled through a hose and nozzle onto the surface. Because the mix is already complete, the application process is fast and creates a dense, monolithic layer. This method is favoured for its speed and the uniformity it provides, especially on large-scale projects where consistency is key. Wet-Mix Process In the wet-mix shotcrete process, all ingredients—cement, aggregates, water, and any admixtures—are blended at a plant or in the transit mixer. The crew has precise control over the water-cement ratio from the start, which is critical for achieving predictable strength and durability. This mix is then pumped to the nozzle, where compressed air propels it onto the forming surface. The main advantage here is the high volume of material that can be placed quickly, with less rebound waste compared to its dry-mix counterpart. Key Benefits of Shotcrete Speed is the headline benefit for shotcrete. For a commercial foundation in East Village with tight timelines, or a large retaining wall project in Springbank Hill, the ability to place concrete rapidly is a major cost and schedule advantage. The process also results in a highly compacted, low-permeability finish that stands up well to Calgary’s freeze-thaw cycles. You get a uniform, high-strength product with less variability from batch to batch, which gives peace of mind on structurally demanding jobs. For projects where time and consistent high-volume placement are critical, shotcrete is often the go-to choice. For homeowners dealing with structural issues, understanding how shotcrete performs is essential—especially for basement and foundation repair projects where durability and water resistance are critical. What is Gunite? Gunite is often confused with shotcrete, but it represents the original “dry-mix” application method. Here, the dry sand and cement mixture is propelled through the hose, and water is only introduced at the nozzle, right at the point of application. This on-the-fly mixing allows the nozzleman incredible control over the consistency and hydration of the mix. It’s a skill-intensive process that, when done by an experienced crew, can be tailored precisely to the job’s needs. Dry-Mix Process The dry-mix gunite process involves feeding a pre-blended dry powder of cement and damp sand into a pressurized hopper. This material is carried by compressed air through the delivery hose. At the nozzle, a separate water line injects the precise amount of water needed to activate the cement. The nozzleman literally controls the mix with their trigger finger, adjusting water flow in real-time based on how the material is sticking to the surface. This hands-on control is what defines the gunite process and requires a highly trained operator. Key Benefits of Gunite The supreme benefit of gunite is its versatility and adaptability. Because water is added at the nozzle, the mix can be adjusted instantly—wetter for overhead work or drier for vertical walls. This makes it ideal for complex shapes and sculptural work, like the curved freeform pools popular in luxury communities like Aspen Woods. It also generally produces less rebound than wet-mix shotcrete, meaning more of the material ends up on the wall and less on the ground. For intricate, rebar-dense projects or repairs where thickness needs to vary, gunite offers unparalleled control. On sloped properties, shotcrete is often used for slope stabilization and retaining wall systems to prevent soil movement and erosion over time. When you need artistic flexibility or are working on complex, reinforced geometries, gunite provides the craftsman’s touch. Key Differences Between Shotcrete and Gunite While both end up as hardened concrete, the journey from bag to wall is fundamentally different. It boils down to *when* the water is added and what that means for your project’s speed, cost, and finish. Application Method and Water Addition This is the core difference. Shotcrete (wet-mix) is concrete, fully mixed with water before it’s shot. Gunite (dry-mix) is a dry powder until the moment it leaves the nozzle. Think of it like a cake: shotcrete is a pre-mixed batter you pour; gunite is combining the flour and eggs right as you pour them into the pan. This simple timing shift impacts everything from the equipment needed to the skill of the crew. It’s the first decision point for any contractor, including experts like OmegaReadyMix, when planning a Calgary job. Mix Consistency and Control With shotcrete, consistency is guaranteed at the plant. Every cubic metre that leaves the facility has the same water-cement ratio, offering predictable strength. With gunite, consistency is in the hands—literally—of the nozzle operator. A skilled nozzleman can create the perfect texture for the task, but this also introduces a variable. The quality of the finished gunite is directly tied to the experience level of the applicator, more so than with shotcrete. Strength and Durability Both methods can produce high-strength, durable concrete when executed correctly. Properly applied shotcrete often has a slight edge in achieving maximum density and low permeability due to its pre-mixed, high-velocity impact. Gunite, when applied by a master, can achieve exceptional bond strength to rebar and existing substrates because the dry material can be driven deep into crevices before hydration. For repairing older Calgary foundations in historic neighbourhoods like Inglewood, this penetration can be key. If you
Best Concrete Mix for Edmonton Freeze-Thaw Climate
If you’ve lived in Edmonton for any amount of time, you already know our winters are no joke. One week it’s -30°C, the next week a Chinook rolls in and everything starts melting—only to refreeze again overnight. While this cycle is tough on vehicles, roads, and roofs, it’s especially brutal on concrete. Every year, homeowners and builders across Edmonton deal with cracked driveways, scaling patios, and spalling sidewalks—not because concrete is a poor material, but because the wrong concrete mix was used for our freeze-thaw climate. The truth is, not all concrete is created equal, and choosing the right mix design is the single most important factor in how long your concrete will last. In this guide, we’ll break down exactly what makes a concrete mix perform in Edmonton’s climate, explain why many concrete surfaces fail prematurely, and show you what professionals look for when specifying durable, freeze-thaw–resistant concrete for driveways, flatwork, and structural applications. Why Edmonton’s Climate Is Hard on Concrete How Freeze-Thaw Cycles Damage Concrete Concrete may look solid, but at a microscopic level, it contains tiny pores and capillaries. When water enters these pores and freezes, it expands by roughly 9%. That expansion creates internal pressure inside the concrete. When the ice melts, the pressure is released—only for the process to repeat again during the next freeze. Over time, these repeated freeze-thaw cycles cause: According to the Portland Cement Association, concrete exposed to frequent freezing and thawing while saturated is among the most aggressive durability environments for cement-based materials. Edmonton fits that description perfectly. Edmonton’s Extreme Temperature Swings Edmonton doesn’t just experience cold—it experiences rapid temperature change. A slab can freeze solid overnight, partially thaw during the day, then refreeze again after sunset. Chinook events can accelerate this process, forcing concrete to expand and contract faster than it was designed to handle. This is why concrete that performs well in milder climates often fails prematurely here. Mix designs that ignore freeze-thaw exposure simply cannot keep up with Alberta’s weather patterns. What Makes a Concrete Mix Freeze-Thaw Resistant? Air-Entrained Concrete: The Non-Negotiable Requirement If there is one feature that defines freeze-thaw–resistant concrete, it’s air entrainment. Air-entrained concrete contains billions of microscopic, intentionally introduced air bubbles distributed throughout the mix. These tiny air pockets act as pressure relief zones. When water freezes and expands, it has somewhere to go—dramatically reducing internal stress and cracking. In Alberta, air-entrained concrete is not optional for exterior flatwork. Industry standards typically recommend: Concrete without proper air entrainment may look fine after the first winter—but by year three or four, surface deterioration often becomes unavoidable. Concrete Strength (PSI / MPa): More Isn’t Always Better Many people assume that higher-strength concrete automatically performs better in freeze-thaw conditions. While strength matters, it’s only part of the equation. For most Edmonton applications, professional mix designs fall within: Higher strength often means lower water content, which can improve durability—but if air entrainment and proper curing are ignored, even high-PSI concrete will fail. Freeze-thaw resistance is about durability design, not just compressive strength. The Importance of a Low Water-to-Cement Ratio Water makes concrete workable, but too much water creates problems long after the pour is finished. Excess water increases porosity, allowing more moisture to enter the concrete—and more moisture means more freeze-thaw damage. Experienced concrete producers aim for a low water-to-cement (w/c) ratio, typically in the range of: One of the most common causes of premature concrete failure in Edmonton is on-site water addition. Even a small increase in water content can significantly reduce long-term durability. Understanding how Edmonton weather affects concrete is key to preventing early cracking and surface damage. The Best Concrete Mix Design for Edmonton (Expert Recommendation) Ideal Mix Specifications for Edmonton’s Climate While exact mix designs vary based on application, exposure class, and placement conditions, professional-grade concrete for Edmonton generally shares several key characteristics: Equally important is maintaining a workable but controlled slump. Excessively high slump often signals too much water, which undermines freeze-thaw durability even if the mix meets strength requirements. Why Aggregate Quality Matters in Freeze-Thaw Conditions Aggregates make up roughly 60–75% of concrete’s volume, and their quality directly impacts performance. In freeze-thaw environments, aggregates must be: Weak or highly absorptive aggregates can fracture internally when they absorb water and freeze, contributing to cracking and surface breakdown. This is why sourcing aggregates suitable for Alberta’s climate is critical—and why local experience matters. Supplementary Cementitious Materials (SCMs) in Cold Climates Materials like fly ash, slag cement, and silica fume are often used to improve workability and long-term durability. However, in Edmonton’s climate, SCMs must be used carefully. For example: Experienced concrete suppliers adjust SCM percentages seasonally to ensure both early-age protection and long-term freeze-thaw resistance. In the next section, we’ll dive deeper into concrete additives, application-specific mix recommendations, and the most common causes of concrete failure in Edmonton—and how the right mix prevents them. Concrete Additives That Improve Freeze-Thaw Performance Air-Entraining Admixtures Air-entraining admixtures are the backbone of freeze-thaw–resistant concrete in Edmonton. These admixtures introduce a controlled system of microscopic air bubbles that remain stable throughout mixing, placement, and curing. For exterior concrete in freeze-thaw environments, industry standards such as CSA A23.1 require consistent air content to ensure long-term durability. Even small variations can significantly affect performance, which is why professional batching and quality control are critical. Well-controlled air entrainment helps: Water Reducers and Plasticizers Water reducers and plasticizers improve workability without increasing water content. This allows contractors to place and finish concrete efficiently while maintaining a low water-to-cement ratio. In freeze-thaw conditions, this matters because: Accelerators for Cold Weather Concrete When concrete is placed in cooler temperatures, accelerators can be used to promote early strength gain. This helps concrete resist early-age freezing before it has developed sufficient strength. However, accelerators must be used carefully. Overuse or improper selection can lead to shrinkage cracking or long-term durability issues. Experienced concrete producers adjust admixture use based on temperature, placement timing, and curing strategy. Application-Specific Concrete Mix Recommendations Concrete Driveways in Edmonton Driveways face
Pouring Concrete in Edmonton: Seasons & Weather
Pouring concrete in Edmonton isn’t as simple as picking a date on the calendar. With long winters, sudden temperature swings, and frequent freeze–thaw cycles, the local climate plays a major role in whether a concrete project succeeds or fails. Homeowners who ignore seasonal conditions often end up dealing with cracked slabs, surface scaling, or costly repairs only a few years later. This guide breaks down how Edmonton’s seasons and weather affect concrete pouring, curing, and long-term durability. Drawing from real-world experience in concrete flatwork, driveways, and cribbing across the Edmonton area, we’ll explain what works, what doesn’t, and how professional concrete contractors adapt their approach throughout the year. Why Weather Matters When Pouring Concrete in Edmonton Concrete may look solid once it hardens, but during the first few days after it’s poured, it’s extremely sensitive to its environment. Temperature, moisture, wind, and ground conditions all influence how concrete gains strength and how long it will last. How Temperature Affects Concrete Strength and Curing Concrete cures through a chemical reaction called hydration. Ideally, this process happens when the concrete stays between about 10°C and 25°C. In this range, strength develops evenly, and the finished surface is more resistant to cracking and scaling. When temperatures drop too low—especially below 5°C—hydration slows dramatically. If freshly poured concrete freezes before it gains enough early strength, the internal structure can be permanently damaged. According to industry research, concrete that freezes in its early stages can lose up to 50% of its long-term strength. On the other extreme, hot weather causes concrete to cure too quickly. Rapid moisture loss leads to shrinkage cracks, weaker surface paste, and reduced durability if proper precautions aren’t taken. The Role of Moisture, Wind, and Sun Temperature isn’t the only factor that matters in Edmonton. Wind and direct sunlight can be just as damaging, especially during spring and summer pours. Professional crews monitor all of these conditions, not just the daytime high temperature, before deciding when and how to pour. Edmonton’s Unique Climate Challenges Edmonton experiences over 120 freeze–thaw cycles per year—far more than many other Canadian cities. These cycles are especially hard on exterior concrete like driveways, sidewalks, and patios. If concrete isn’t air-entrained or cured properly, moisture inside the slab expands during freezing, leading to surface scaling and spalling. This is why concrete that performs well in milder climates often fails prematurely in Edmonton if local conditions aren’t considered. Understanding how Edmonton weather affects concrete helps explain why timing, curing, and mix design matter so much.” Best Time of Year to Pour Concrete in Edmonton: A Seasonal Overview Many homeowners ask, “What’s the best month to pour concrete in Edmonton?” The honest answer is that there isn’t a single perfect season. Each part of the year comes with advantages and risks, and experienced contractors adjust their methods accordingly. Season Advantages Main Risks Spring Moderate daytime temperatures Overnight frost, wet ground Summer Fast strength gain, stable subgrade Rapid drying, shrinkage cracking Fall Cool, consistent conditions Sudden cold snaps Winter Possible with controls Freezing, higher costs Below, we’ll explore the first two seasons in detail to help you understand how timing affects quality and cost. Pouring Concrete in Spring in Edmonton (March to May) Spring is one of the most unpredictable times of year for concrete work in Edmonton. While daytime temperatures may feel mild, overnight lows often dip below freezing well into April—and sometimes even May. Advantages of Spring Concrete Projects Spring offers a head start on construction projects after winter delays. For homeowners eager to complete driveways, garage pads, or sidewalks before summer, spring can be appealing. Cool daytime temperatures also reduce the risk of rapid moisture loss, which helps finishing crews achieve a smoother, more uniform surface. Spring Risks: Frost, Moisture, and Ground Conditions The biggest challenge in spring is what’s happening below the surface. Even if the air temperature is above zero, frost can remain in the ground. Pouring concrete over frozen subgrade is a common mistake that leads to settlement and cracking once the ground thaws. Spring snowmelt also increases moisture levels, making proper drainage and base preparation critical. Without a stable, well-compacted base, concrete slabs are far more likely to fail. How Professionals Manage Spring Concrete Pours Experienced Edmonton concrete contractors take several precautions in spring: These steps help ensure that early-season concrete performs just as well as pours completed later in the year. The American Concrete Institute notes that concrete exposed to freezing before early strength development may suffer permanent durability loss. Pouring Concrete in Summer in Edmonton (June to August) Summer is widely considered the best season for pouring concrete in Edmonton—but it still comes with challenges. Warm weather allows concrete to gain strength quickly, but without proper moisture control, it can cure too fast. Why Summer Is Peak Concrete Season Consistent warm temperatures and fully thawed ground make summer ideal for most concrete applications. Driveways, patios, sidewalks, and flatwork can all be completed efficiently during this season. From a scheduling standpoint, summer also offers fewer weather delays, which helps projects stay on track. Hot Weather Concrete Challenges When temperatures climb above 25°C, concrete can lose moisture faster than it can be finished. This increases the risk of plastic shrinkage cracking—thin cracks that appear within hours of placement. According to concrete industry studies, evaporation rates above 1.0 kg/m²/hr significantly increase cracking risk if protective measures aren’t used. Professional crews combat this by adjusting pour times, using curing compounds, and carefully managing water content to protect long-term strength. Pouring Concrete in Fall in Edmonton (September to October) Fall is often considered the most underrated season for pouring concrete in Edmonton. With cooler daytime temperatures and fewer extreme weather events, many professionals view early fall as a “sweet spot” for high-quality concrete work. Why Fall Conditions Are Ideal for Concrete During September and early October, temperatures are typically cool but stable. This slower curing environment allows concrete to gain strength evenly, reducing the risk of surface cracking and shrinkage. Wind speeds also tend